How to Install an EV Charger Wall Plug at Home?
Installing an Ev Charger Wall Plug at home is becoming essential. With electric vehicle sales expected to surpass 30 million globally by 2030, the demand for home charging solutions is rising. Many car owners prefer charging at home rather than visiting public stations.
This shift reflects a changing mindset and the recognition of sustainable energy. Reports indicate that over 70% of EV owners choose to charge at home. This trend highlights the need for accessible and efficient charging solutions. Understanding how to install an EV Charger Wall Plug is vital for these owners.
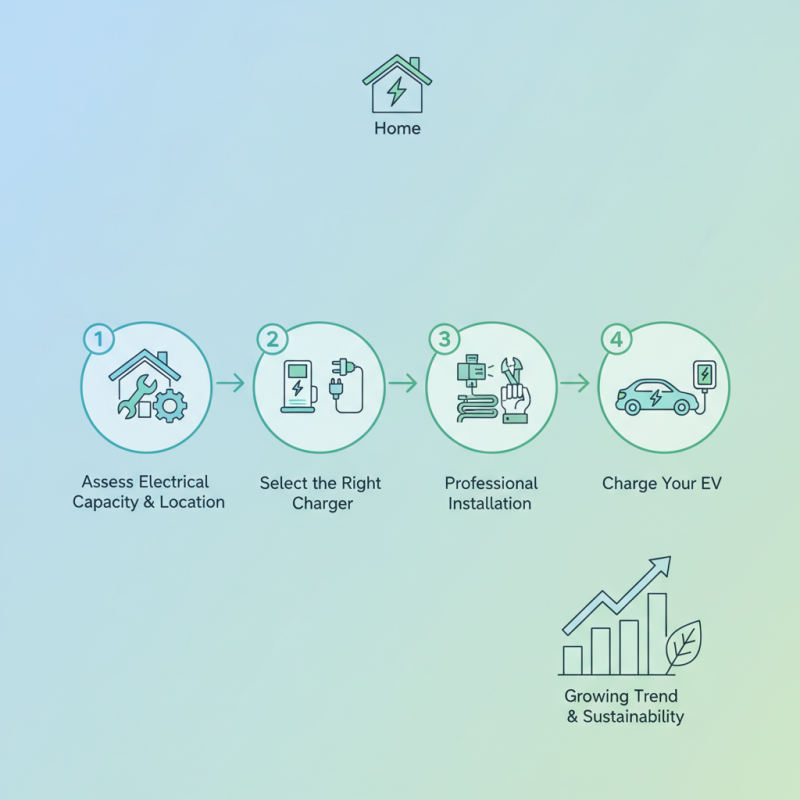
However, the installation process can be daunting. Factors like electrical capacity and location must be considered carefully. It’s crucial to select the right charger for your home environment. Each step should be approached with precision to ensure safety and efficiency. Familiarizing yourself with the installation process can save time and prevent pitfalls. Embracing this change is significant but requires reflection on personal energy use.
Understanding EV Charger Wall Plugs: Types and Specifications
Installing an EV charger wall plug at home can seem daunting. Understanding the different types and specifications is crucial. There are two main types: Level 1 and Level 2 chargers. Level 1 chargers use a standard 120V outlet, making them suitable for overnight charging. However, they are slower, typically adding about 4-5 miles of range per hour. According to the U.S. Department of Energy, most EV owners prefer Level 2 chargers, which operate on 240V. These can add 25 miles of range per hour, significantly reducing charging time.
Specifications also play a vital role. Amperage ratings vary. Common ratings include 16A, 24A, and 32A. Higher amperage means faster charging, but requires proper electrical setup. A report by the International Energy Agency highlights that charging infrastructure needs to match EV demand. Without proper compatibility, the installation may become ineffective. Moreover, some homeowners might face challenges like circuit capacity limits.
Safety is another consideration. While many chargers come with built-in safeguards, improper installation can lead to hazards. It’s essential to assess your electrical system before installation. Consulting a professional for guidance can prevent issues. Some might underestimate the importance of location as well. Ideally, the charger should be installed where it is easily accessible, yet not obstructive.
Choosing the Right Location for Your EV Charger Installation
Choosing the right location for your EV charger installation is crucial. The ideal spot should be easily accessible. This ensures daily use without hassle. Homeowners often overlook the importance of placement until it’s too late. Consider the distance between your EV and the charger. Longer cables may become a tripping hazard. In fact, the National Renewable Energy Laboratory suggests keeping the distance under 25 feet for safety.
Lighting is another important factor. A well-lit area helps prevent accidents during nighttime charging. Some studies indicate that inadequate lighting can lead to a 30% increase in accidents. Also, the location should be near a power source. Installing a charger in a garage is practical, but it requires checking electrical capacity. Many homes face this challenge, especially older ones with outdated wiring.
Consider the weather conditions in your area. Extreme temperatures can affect charger performance. According to industry reports, the efficiency of EV chargers drops by about 10% in extreme cold. This means understanding how your chosen location will impact the charger’s functionality. It’s not just about convenience; it’s also about safety and efficiency. Assessing all these factors early can lead to a smoother installation process.
EV Charger Installation Locations Survey
Gathering Necessary Tools and Materials for the Installation
Installing an EV charger wall plug requires careful preparation. Gathering the right tools and materials is crucial. Start with basic tools like a drill, screwdriver, and wire stripper. Don’t overlook safety gear, such as gloves and goggles. You might think a good toolkit is all you need, but you should inspect your electrical panel, too.
Next, consider the materials necessary for the installation. You'll need an EV charger, suitable wiring, and a circuit breaker. Some people forget about conduit and connectors, which are important for protection. Each component plays a role in ensuring safe operation. It may seem easy, but misjudgments can lead to issues.
Lastly, remember to check local codes and regulations before starting. Sometimes, it feels overwhelming, especially if you’re new to electrical work. Mistakes can happen, and that's okay. Just take your time and don't rush. It’s better to be safe than sorry.
How to Install an EV Charger Wall Plug at Home? - Gathering Necessary Tools and Materials for the Installation
| Item | Quantity | Description |
| EV Charger Wall Plug | 1 | The main charging unit that connects to your electric vehicle. |
| Circuit Breaker | 1 | A safety device that prevents overloads in the electrical circuit. |
| Electrical Wiring | As needed | Wire that connects the charger to the home’s electrical system. |
| Mounting Bracket | 1 | Used to securely attach the charger to the wall. |
| Screws and Anchors | As needed | Fasteners for securing the mounting bracket to the wall. |
| Drill | 1 | Power tool for making holes in the wall for installation. |
| Screwdriver | 1 | Tool used for driving screws into the wall. |
| Level | 1 | Tool used to ensure the charger is mounted straight. |
| Safety Goggles | 1 | Protective eyewear to keep your eyes safe during installation. |
| Electrical Tape | 1 roll | Used to insulate electrical wires and connections. |
Step-by-Step Guide to Installing an EV Charger Wall Plug
Installing an EV charger wall plug at home can be a rewarding project. It makes charging your electric vehicle easy and convenient. Start by choosing a suitable location, ideally close to your parking space. Ensure the area is dry and resistant to the elements. Consider your electrical panel’s proximity to the installation site.
Before beginning, check your local codes and regulations. This step is crucial. You might need permits. A licensed electrician may be required for the installation. Gather the necessary tools, including a drill, voltage tester, and wire connectors. Be prepared for potential challenges. Not every garage or home is ideal for this setup.
Tips: When working with electrical systems, ensure safety always comes first. Turn off the power before starting. This simple step can prevent accidents. Also, think about future needs. Plan for higher charging speeds or additional chargers. Don’t rush. Patience is essential in this project.
After the installation, test the charger thoroughly. Make sure it is functioning correctly. Address any issues as they arise. It’s okay to seek help if you're unsure about something. A well-done installation can enhance your daily routine and increase the value of your property.
Testing Your EV Charger: Ensuring Safe and Efficient Operation
Testing your EV charger is an essential step in ensuring its safe and efficient operation. After installation, plug the charger into an outlet. Observe for any unusual sounds or smells. A well-functioning charger should operate quietly and without heat. If you detect anything out of the ordinary, unplug it immediately.
Next, connect your electric vehicle and monitor the charging process. Look for indicators on the charger, such as lights blinking or changing colors. These signals often tell you if the charger is working correctly. Take note of the charging time. If it differs significantly from the manufacturer’s specifications, there could be an issue worth investigating.
After the initial tests, consider performing regular checks. Inspect cables for wear and tear. Look for any cracks or frays. If anything seems off, consult a professional. Remember, safe operation is crucial. Don't ignore small problems, as they can escalate into bigger issues. Keep a log of your tests and check-ups to track performance over time.
